Showing posts with label DIY projects. Show all posts

Sunday, May 26, 2013

3 Day Weekends

Have been under the weather this week. My eyes are still not healed completely from cataract surgery. I am having a rebound effect from coming off the steroid drops and the treatment is to go back on them for four more weeks. Haven't felt much like blogging. 
Here are some things I am working on though.

I decorated flip flops.

If I perfect this skill I will be able to decorate a bride pair for my daughter's spring beach wedding.  Need lots of practice. My lovely new neighbor showed me and some other women how to make these at a get acquainted coffee/craft hour yesterday morning. 
DIY ~ The trick is to glue or sew seam binding around the thong.  Then you can hot glue what ever you want to the fabric.   

I went thrift shopping.  
Love this collection of vintage frames. They will be going in my shop as I have no place left to display anything in my home.  In fact I think I should sell everything and go minimalist at home.  Less to clean.  I do love all my shabby stuff and still can't bring myself to part with most of it.


Had a long time today to concentrate on photographing items for my Etsy shop.  The sunlight on the lanai was good and it wasn't to hot outside. 
It is always fun setting things up for pictures. 

Tomorrow is my third day off in a row. It feels like heaven to have some time off and be able to stay home and get things like these pictures accomplished. 
What are you working on?
Anne

Saturday, March 2, 2013

Thrift Shopping Junkie

Thanks to hubby for driving me all over Venice this am. We caught 3 great thrifts!  One a church tag sale and two Mobil Home Park Sales. Elbow to elbow and dodging rain drops to get in the doors.  These sales are mobbed. I even went a little later in the morning just so the crowds would die down a bit.  I always find something that nobody else saw as the top layers are sold off first leaving some rare beauties for me!
For my self I bought a hand made project bag from the sweetest little lady in a mobile home park.  Perfect for the knitting I am doing for my next grand baby who is due to arrive four weeks from today!


I wish I had gotten more of these cute bags now.  They also had homemade molasses cookies at this sale. I can't show you them. I ate them all up in the car.  Soft chewy and so so good. 

It just makes good sense to buy baskets. Love these two produce baskets and loved filling them up with more things to buy.  The sifter is small and very sweet.  The books will go to Mya's house tonight. 


Gorgeous shabby chic shelf with tons of detail.


I found this very old framed mirror with some kind of floral painting on it.  Can't wait to get a better look at that beauty. 


Wonder if any one wears bed jackets any more.  It would be fun to wear on Mother's Day for breakfast in bed!  All blue frothy chiffon, lace and satin ribbons.  

Oh I really wish I had shopped more at the bake sale table.  
Anne

Sunday, August 26, 2012

Shabby Chic Finishing Part 2

Putting the final touches on any project is usually the most fun.
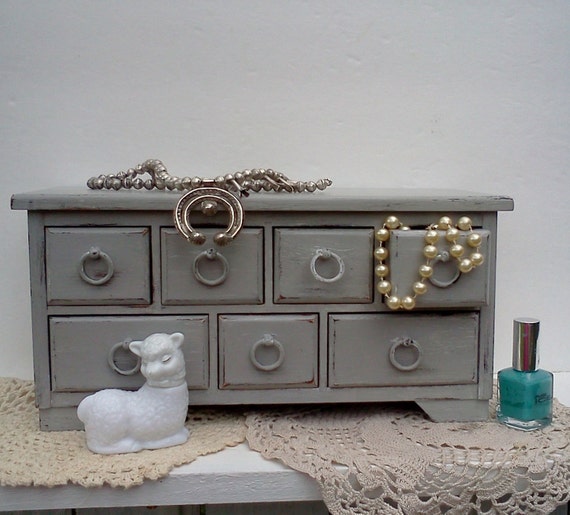
Today I am waxing, polishing and cleaning the jewlery box started yesterday.

Step 3.  Applying wax.
applying the wax

With a soft rag apply one thin coat of wax to the wood surface. If the item you are waxing has glass or mirrors on it tape them off so you don't get wax on the glass.  It is hard to remove.  I like to use beeswax like this product. link  There are many places on the internet where you can buy beeswax.  My niece is raising bees and I wonder what she will do with the left over combs after she extracts that deliscious honey! 
Olver Honey Combs yummm

Of course you can also use a manufactured furniture wax like Minwax Paste wax link
Once the wax is applied allow it to dry for a minimum of 10 mins. 
polishing with a soft hand towel

Polishing... with another soft cloth begin polishing after the wax has dried.  This just takes elbow greese.  Lots of elbow greese! I like to go in one direction and really rub hard until I get a luster going on.  If wax is caked into any little tight spots I use an old soft toothbrush to get at it.  The wood is going to start feeling like a smooth beach stone.  Wax dries to a hard durable finish. 

Step 4.
Cleaning the inside compartments of the jewelry box.  My method is to knock out what ever I can.  Then I use 2" wide tape do get the job done. Wads and wads of tape.  I stick it on and press it down firmly. I use the pointy end of an old paint brush to get the tape into little corners and seams.  Voila when you pull the tape off the dirt and most of the grime comes with it.  This takes awhile when there are lots of little drawers.  It is worth taking the time to do it right.
tape pulling out the grime

As you can see this drawer was pretty dirty. The red velveteen fabric had a lot of dust and grime on it.
dust in all the corners using a stick to get it pressed into all the crannies...

The sides and corners were full of dust and lint.  It took alot of tape to get all that up.  A small stained area remained after the dust and grime was pulled away. 
cleaning with stain remover

A paper towel with some stain remover will get that stain out.  I have used this stain remover on all colors of velveteen linings and never had a mishap with it. I have sprayed it directly onto the interior of the box as well as a little on the paper towel. 
looking new and clean
 
I just dab away at it until it comes clean and look what a great job it did.  It looks new.  This is also a time when you can glue down any loose lining.  If the lining is so badly damaged that you cannot get it clean pull it out. You can always reline it with fabric or paper.
Once my jewelry box is painted, polished and cleaned I like to set it in the sunshine for several hours.  Sunshine really cleans.  It removes any lingering odors and does wonders to freshen up your project.  Good old Mr Sunshine.


Seven clean drawers in the sun!
I love the way this turned out. The Paris Gray paint is so rich and pretty. It is just the way I imagine Paris to be on a foggy spring night when the street lights come on.  Romantic ...Well a girl can dream...


ready for jewels!

French Country Jewelry Box Painted Paris Gray Vintage Upcycled
available in my Etsy Shop here:  link

Enjoy some Shabby Chic !
weelambie/Anne


Sunday, July 15, 2012

Tea Staining Hang Tags DIY

I was very lucky to come home from an estate sale yesterday with a box full of mailing supplies. Included in this $1.00 score were dozens of brand new hang tags.
I decided to find out how to antique the tags with tea stain.  There are lots of ways to do this I discovered on google.  I like to simplify things.
Here is what I came up with.
Tea Staining 101
  • boil 1 cup water. Steep 3 black tea bags about ten mins. More or less steeping and water depending on the color you want.
  • Pour the tea into a glass baking dish. Dunk all the labels into the tea. Let them soak in there while you slosh them about a bit.  This lasted about five minutes for me to get the color I wanted.
  • Take the labels out and lay them on a table in the sun to dry.

Voila labels drying in the sun on my lanai work table.
To make them more appealing as they dry and time permits I will dab more stain on them directly with the wrung out tea bags.  Dabbing along the edges and here and there to make them a bit more shabby. 
The tags should be dry and ready for decorating by the time we get our late afternoon rain showers. 
They can be decorated with ribbons, stamps, anything your creative mind and supply cache allows.
Enjoy.
Anne