Showing posts with label Shabby Chic painting. Show all posts

Saturday, March 23, 2013

Projects Completed

I finished the Shabby Chic shelf.  The white paint looked lonely so I added some color. At first I was going to glue some pretty paper onto the inside of the little cubbie holes, but I decided to use my favorite blue paint.
I am happy with the result.  All in all it was 3 coats of paint in most areas.  I distressed it with a really gritty sand paper here and there and then waxed with paste wax.  It is in my etsy shop ...Shabby Cottage Chic here
Yesterday when I was on the way to work I was lucky enough to have time to stop at a neighborhood rummage sale. 
I found so many great items. If course I love the chippy white paint on this corner shelf, but I also fell hard for some mushrooms.
When I was a new bride in 1972 my kitchen was all orange and brown and mushrooms were popping out all over the place.  Now it is vintage.
This collection of thread was begging to go home with me. 
I love community tag sales.

Since the white and blue shelf was last weeks finished project I think I will also show the last plate of corned beef and cabbage I will ever cook.
It looks so yummy, but the salt and the spices and the way we had to air out the house for 2 DAYS!!!!  Not doing this again. I will celebrate St. Patrick's Day with green beer next year.
Anne

Saturday, March 16, 2013

Plans and Projects

My weekends are just not long enough for all I want to do.  
I got precious little done today on my shabby chic projects. 
I have several projects to work on and so far only these two have seen any paint.  It was a beautifully sunny day. The temp was 72 degrees and the wind was blowy.  I had paint flying all over the blue table. Tomorrow I will be able to start sanding and waxing these two pieces.  That is my favorite part of the process in creating shabby chic pieces. 
I love the detail on this wooden shelf and can't wait to finish it. 

While I am showing off this pretty carved wood let me show you what I have been finding at yard sales. Tools!  I love old tools. Look how pretty these are.
I have already sold some of them, but still have a collection or two in my etsy shop here
The feel of the wooden handles and the glints of paint, rust, sweat, oil, and patina of use on these old pieces really makes them beautiful. 
Today I found some vintage embroidery hoops.  I love collecting these.  They will soon be available in my supplies section of my etsy shop. here

This last wooden hoop has no spring or screw tension device. I haven't seen one like this before. Who ever owned it put lace trim and string around the inside hoop to give it more 'grip' I think. The wood is smooth as silk.

Anne

Sunday, February 3, 2013

Making Shabby Chic Jewelry Boxes

With the wonderful cool Florida weather I can't resist working on the lanai.  This is the perfect time of the year to do these projects.  The breeze blows the sanding dust away and the paint dries in no time at all.
All you need is an old jewelry box, some sandpaper, coffee and elbow grease.

Sanding off the old varnish.


This is the worst time of year in Florida for allergies.  Since I am medicating for seasonal allergy I may as well put sawdust on the list of things that make me sneeze.

This jewelry box has a music box inside it!  I'd forgotten all about that. 


Etched glass doors removed.  All sanded and ready for paint.

First coat of white latex paint going on.  Tried a great new yogurt flavor for lunch.   
While this dries I think I need a cat nap.
I will dream about painting everything in the house white.  I almost have my courage up to tackle the cherry dining room table and the pine hutch and cabinet.  Should I?
I love white.
Here is some on Etsy.

This little shelf is in my etsy shop here: link


I found this jadeite juicer at an estate sale on Friday.  It is chippy and worn, but I still love it.  Not everything has to be new and not all vintage has to be perfect.  Sometimes the signs of age just make me love something all the more.  The young woman who sold me this said it was her Grandmother's and it was very old (1930's).  She had memories of her Grandmother squeezing oranges and grapefruits with it.  It is still usable but also just the most lovely shade of green. link

That nap is calling me. 
Anne

Sunday, August 26, 2012

Shabby Chic Finishing Part 2

Putting the final touches on any project is usually the most fun.
Today I am waxing, polishing and cleaning the jewlery box started yesterday.

Step 3.  Applying wax.
applying the wax

With a soft rag apply one thin coat of wax to the wood surface. If the item you are waxing has glass or mirrors on it tape them off so you don't get wax on the glass.  It is hard to remove.  I like to use beeswax like this product. link  There are many places on the internet where you can buy beeswax.  My niece is raising bees and I wonder what she will do with the left over combs after she extracts that deliscious honey! 
Olver Honey Combs yummm

Of course you can also use a manufactured furniture wax like Minwax Paste wax link
Once the wax is applied allow it to dry for a minimum of 10 mins. 
polishing with a soft hand towel

Polishing... with another soft cloth begin polishing after the wax has dried.  This just takes elbow greese.  Lots of elbow greese! I like to go in one direction and really rub hard until I get a luster going on.  If wax is caked into any little tight spots I use an old soft toothbrush to get at it.  The wood is going to start feeling like a smooth beach stone.  Wax dries to a hard durable finish. 

Step 4.
Cleaning the inside compartments of the jewelry box.  My method is to knock out what ever I can.  Then I use 2" wide tape do get the job done. Wads and wads of tape.  I stick it on and press it down firmly. I use the pointy end of an old paint brush to get the tape into little corners and seams.  Voila when you pull the tape off the dirt and most of the grime comes with it.  This takes awhile when there are lots of little drawers.  It is worth taking the time to do it right.
tape pulling out the grime

As you can see this drawer was pretty dirty. The red velveteen fabric had a lot of dust and grime on it.
dust in all the corners using a stick to get it pressed into all the crannies...

The sides and corners were full of dust and lint.  It took alot of tape to get all that up.  A small stained area remained after the dust and grime was pulled away. 
cleaning with stain remover

A paper towel with some stain remover will get that stain out.  I have used this stain remover on all colors of velveteen linings and never had a mishap with it. I have sprayed it directly onto the interior of the box as well as a little on the paper towel. 
looking new and clean
 
I just dab away at it until it comes clean and look what a great job it did.  It looks new.  This is also a time when you can glue down any loose lining.  If the lining is so badly damaged that you cannot get it clean pull it out. You can always reline it with fabric or paper.
Once my jewelry box is painted, polished and cleaned I like to set it in the sunshine for several hours.  Sunshine really cleans.  It removes any lingering odors and does wonders to freshen up your project.  Good old Mr Sunshine.


Seven clean drawers in the sun!
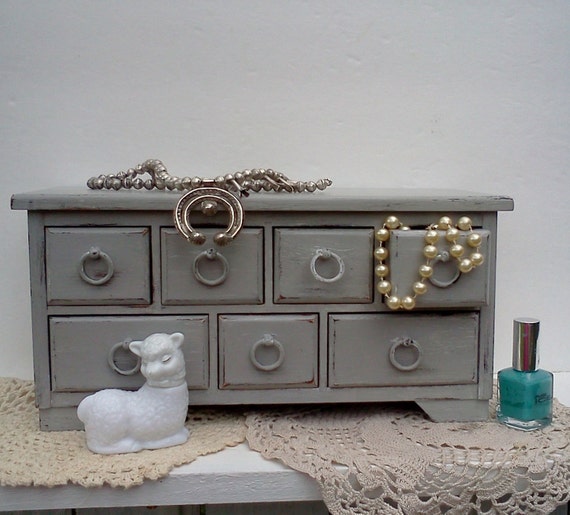
I love the way this turned out. The Paris Gray paint is so rich and pretty. It is just the way I imagine Paris to be on a foggy spring night when the street lights come on.  Romantic ...Well a girl can dream...


ready for jewels!

French Country Jewelry Box Painted Paris Gray Vintage Upcycled
available in my Etsy Shop here:  link

Enjoy some Shabby Chic !
weelambie/Anne


Thursday, June 7, 2012

Upcycling Shabby Chic / Vintage

Works in progress upcycling vintage to Shabby Chic with paint, bees wax and elbow grease. 
VINTAGE SHELF BEING MADE INTO HANDMADE SHELF??

Etsy Vintage vs Etsy Handmade
When I tried to list my first upcycled vintage jewerly box on Etsy I ran into the problem of classifying items correctly.  I thought if something was vintage when I started repairing, sanding, painting it that it would still be vintage when I was done.  I was wrong... apparently. " Vintage is vintage and handmade is handmade"  or so I have been told.  This still mystifies me.  Many old vintage and even antique items have been repaired, painted, fixed up, given new life over the decades.  We still call them antiques and vintage.  If you do it on etsy you have somehow falsified the 'vintage' aspect and made something else, something new, something handmade.  I might even be brave enough or foolish enough to call it OOAK... an Etsy anagram for One Of A Kind. 
Now I have to come to terms with this as Etsy is inflexible on some points while it flexes wildly on others. 
I don't plan to rock the boat.
I just do. I step in a new boat...this time the boat of 'upcycling vintage' and the boat tips.
My survival will depend on how I manouver in this new boat.  The boat will not change it will still  float.  I will be the one tossed about and possibly drown.  Well isn't that a little melodramatic, but that is me always with the drama. 
I still call it upcycled Vintage. After all that is exactly what it is.  I will list it under handmade and tag it with both.  I just can't add my favorite teams tag to it as that has too much Integrity in it to go on something once vintag(still vintage) and now handmade.  I was told this today.   Remove the team's tag.  It stung like a slap in the face.  I have never been good at following rules.  It is in my nature to see things from many aspects, many angles, in many lights.  I am terrible at black and white, right and wrong, I always find other ways.  I am tolerent of others.  I am forgiving to a fault.  Something my mother told me could bite me in the butt. 
I probably should have been sent to a military school...gotten the rules drilled into me.  Instead I grew up Unitarian with some Quaker tossed in here and there.   So I give in and bend allow them to have their views of what is vintage and I will live with mine. 
This is my latest finished piece of Upcycled Shabby Chic
Upcycled Shabby Chic Vintage Jewelry Box
My recipe.
lightly sand
paint,
sand,
x 2
lovingly rub in bees wax and polish to a rich patina. 
Add TLC
decorate with pearls
photograph

be true to your God and your own compass it is probably pointing you in the right direction as God guides you on your way.
Anne
all hung with pearls and jewels